
The A Chord

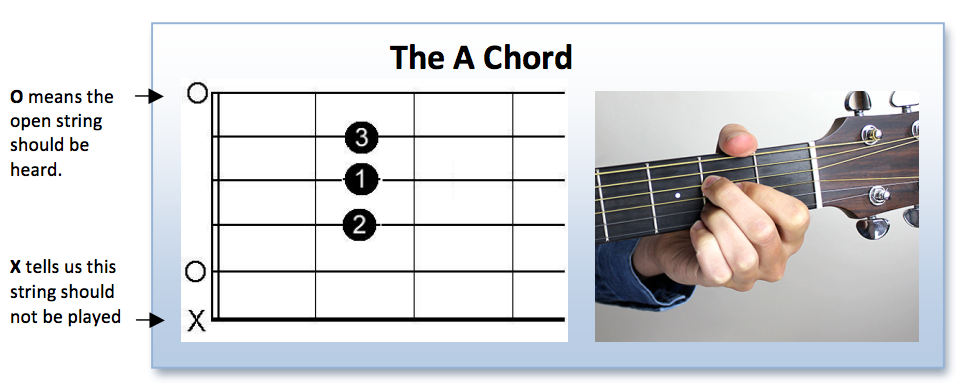
Hi guys, in this lesson I'm showing you how to play the A major chord, which is the second chord that I recommend that absolute beginners learn. So let's get in for a close up straight away. So this is our A major code. And it can also be played like this, but I'd really recommend sticking to this way of playing it because it will really help with the transition between the first chord we learnt, the E, and the A chord because that first finger doesn't lift off so we don't have that mad panic where we go, ah, where do my fingers go? So this is the way I would recommend that we look at this A code, but I will show you the other one as well. So we have our first finger on the 2nd fret and it's the 3rd string, so 123 from the lowest one. And this one needs to be around in the middle of the fret because our middle finger is gonna go just above it on the string 4, also on the 2nd fret. And your 3rd finger goes directly below that 1st finger. So they're all on different strings, also at the 2nd fret and that's on string 2. And when we strum this chord, we want to strum it from string 5. The reason for that is that thickest string is called the E string and the next one is called the A string. So that A is the lowest note we want heard in this A chord. Now we can do that by just strumming from string 5. And if we have each finger right on the tip and you're not touching the bottom of the guitar like this, all 5 strings should ring out. So that one more time, we have first finger. Second finger. And 3rd finger there. And they're all on the 2nd fret. To check that that is ringing out, we want to pick each individual string from string 5, so not the thickest one, we wanna pick it from string 5. And go through each one. And we can hear that they're ringing out great. We do also have this way of playing an ear chord, which is entirely valid and when I first learned guitar, this was the only ear chord I knew of. It's only since I've been teaching that I've found that the other one is really useful. So with this one we have our first finger on the 2nd fret of the 4th string. Middle finger, 2nd fret just below it, and 3rd finger again just below it. So this is far easier to visualise however when you start playing guitar and trying to learn songs you'll find that actually pressing your fingers and learning a shape is tricky at first but it's OK to learn, it will come quite quickly. It's changing between the chords and putting everything together that makes everything quite difficult, so this. It's certainly a valid and a great A chord, but I would go for this way of playing it. For example here, So this is that a chord shown in a chord diagram. So we can see we've got a little X on the thickest string and uh that means that we don't wanna play string 6 essentially. And this is how we'd uh this is the chord diagram for this example here. So we've got 1 in the middle, 2 above it, and 3 below it. And everything is on that second fret. And the tricky thing is generally making sure that all 5 strings ring out, which you can check. By picking each individual one and keeping your fingers right on the tips, um, and making sure we don't touch the bottom of the guitar. They're the key points of getting a great sounding A major chord. So that's how to play our first two major chords. Now it's very tempting for people to want to learn more chords so that they can do more songs. But I've managed to find 10 songs that use just these two chords and those already have videos. For each one of those song lessons on my website at Andyguitar.co.uk. But what we want to do before we get to those songs, which I'd recommend getting to as soon as possible really, but we want to get the changes between these two chords down. So that's gonna be in the next lesson that follows this one, how to change between the E and A major chord. And then you can learn some strumming patterns and then we can get you on to learn some songs. So hopefully I'll see you in one of those next lessons. Thank you very much for watching and bye for now.
In this video
Andy Guitar Beginners Course eBook 2016 - 2nd Edition
The A Chord
Open String Names
You’ll need to know the names of the open strings. Using a mnemonic can help you remember them. For example; Elephants And Donkeys Grow Big Ears to remember E A D G B E (thickest to thinnest!).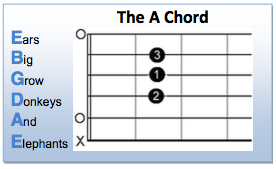
Another student favourite to remember the open string names is Eddie Ate Dynamite - Good Bye Eddie!
Memorising open string names is essential for tuning your guitar. Learn how to tune your guitar here.