
E Major Chord & E5 Power Chord for Total Beginners
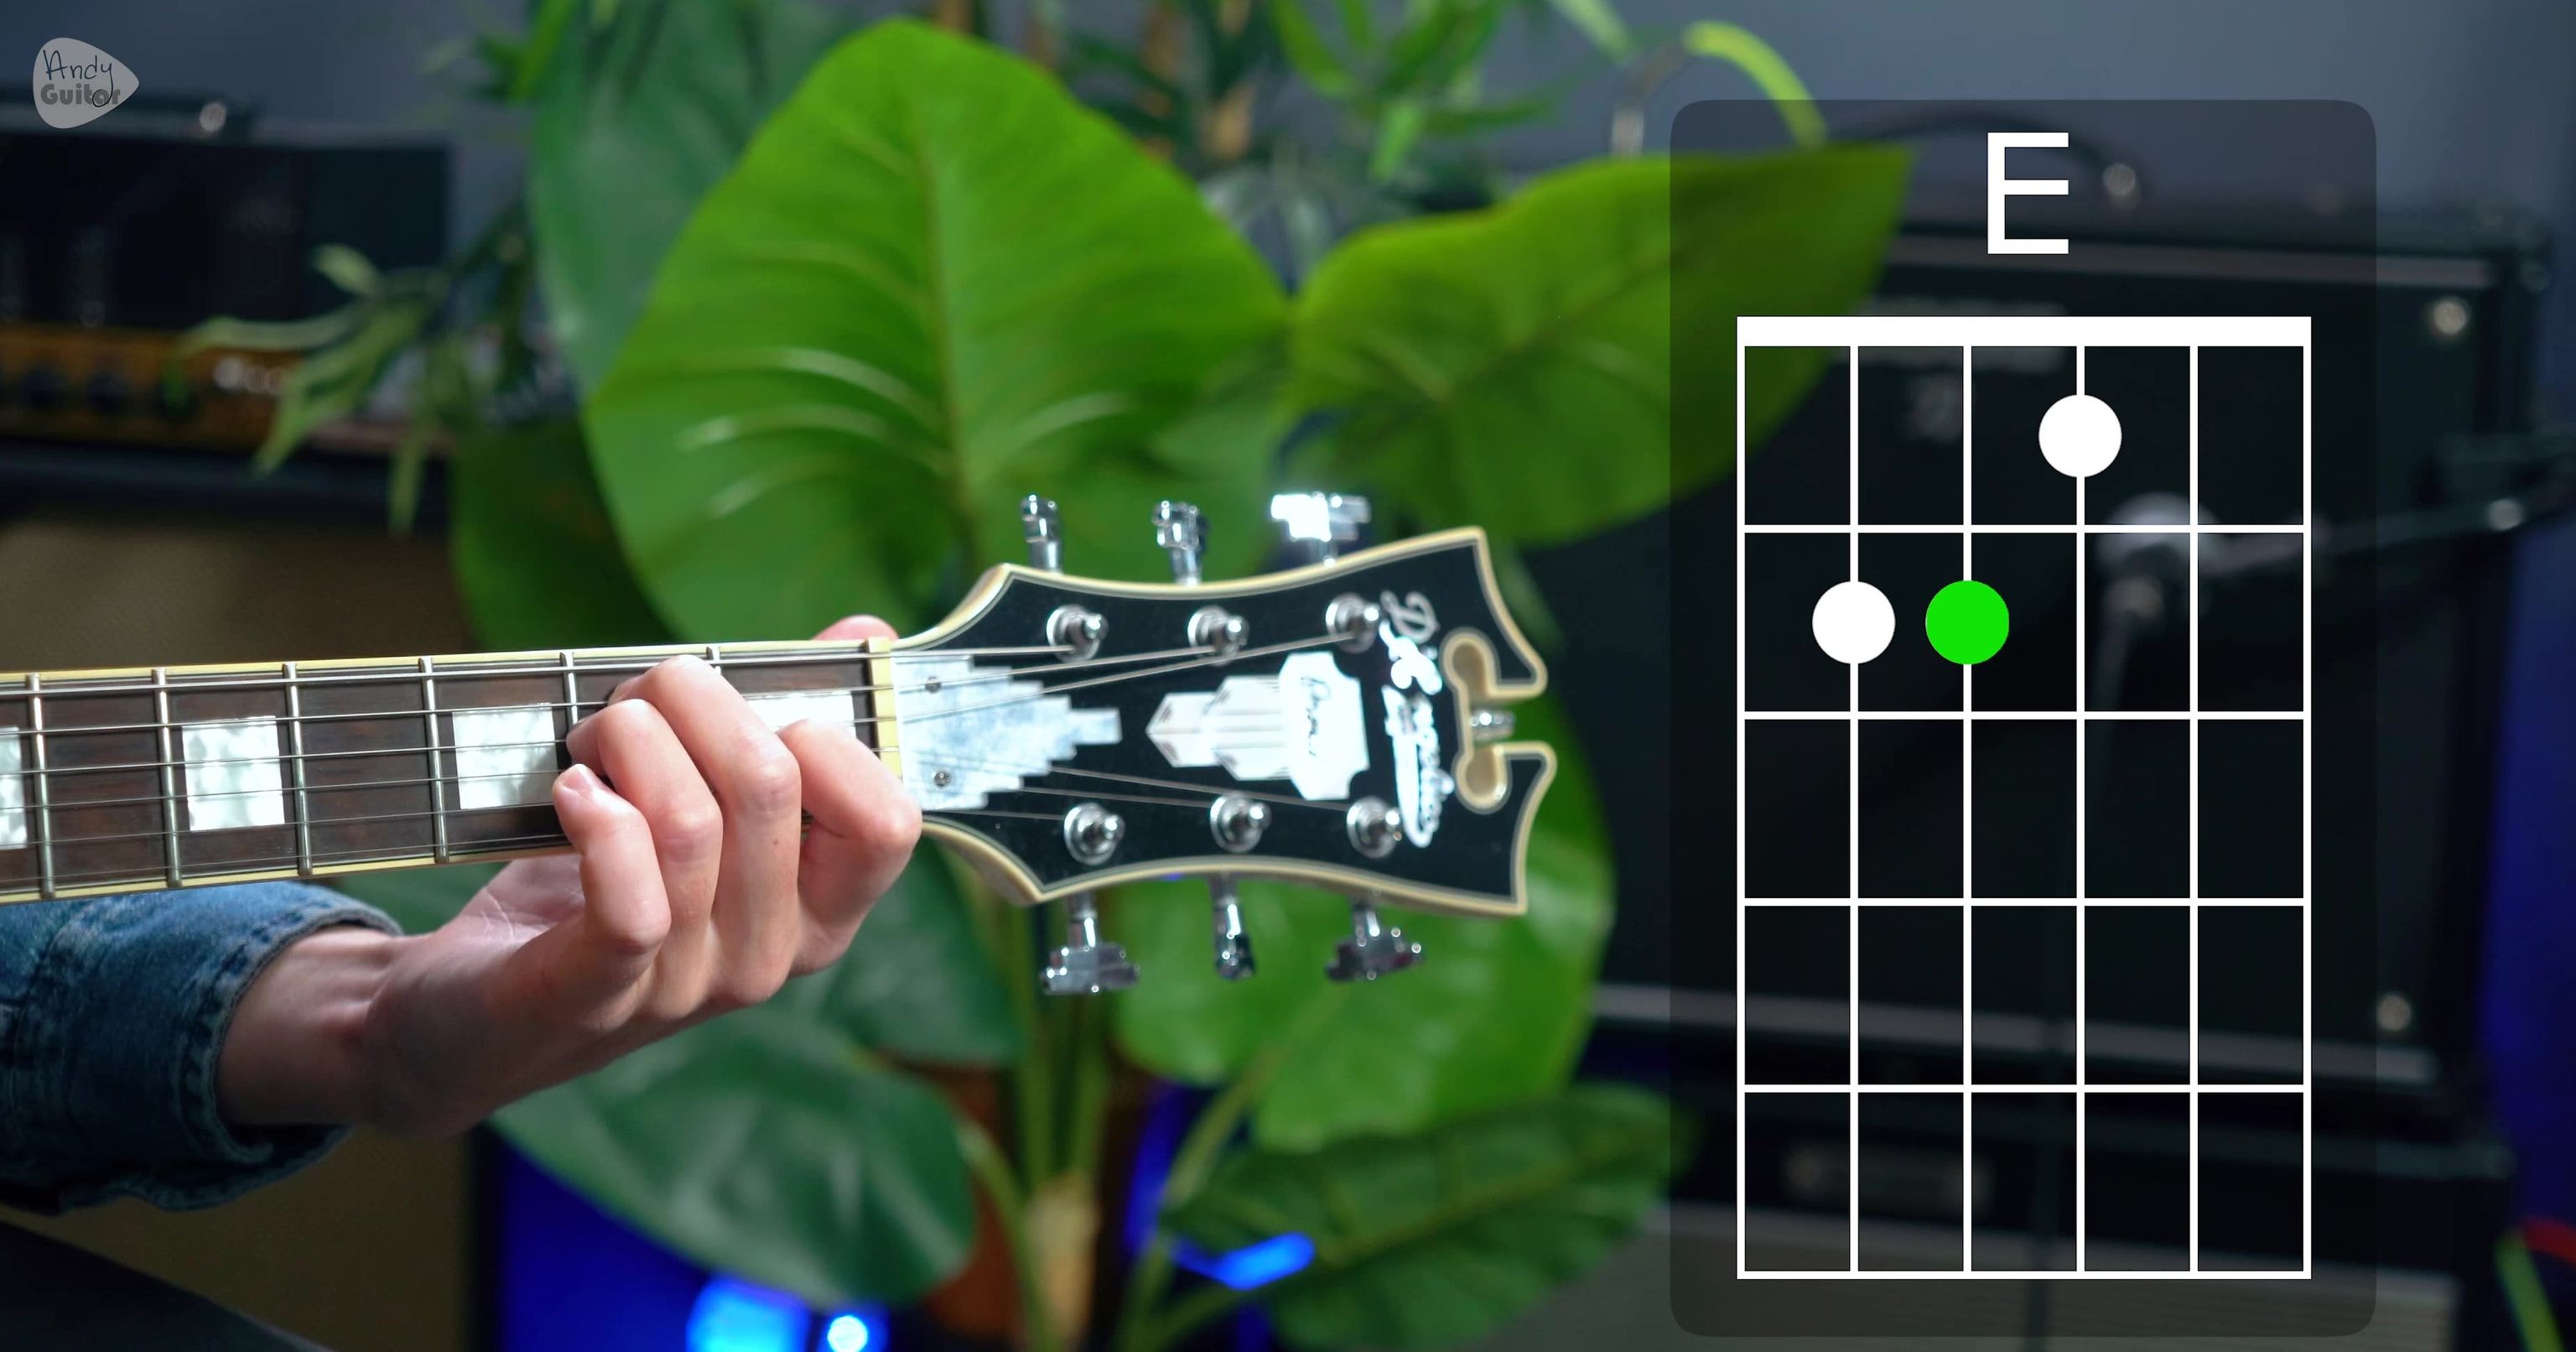
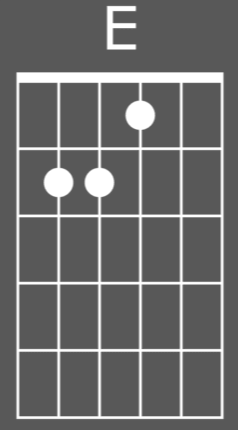
Here's the E major chord and here's what it sounds like with a clean tone. And with a crunch tone. And it just needs 3 fingers there. We have the first finger or the index finger on string 3, fret 1, so 123. Fret one, which means we're just at this side of this fret one area, but we want to be just here. The middle finger's going to go string 5 for a 2. Third finger or ring finger just underneath on string 4, and this is the shape that our fingers need to be in to play the E major chord, and we strum all 6 strings. Ideally with a pick, or with the nail of your first finger. You can strum with the thumb itself, but you're going to get a louder, brighter sound with your index fingernail, and even better, use a pick. A pick is the best way to get the loudest, brightest sound. Hold it between your first finger or index finger and your thumb, or two fingers and a thumb is totally fine, and drag it down. All 6 strings, just with a small motion of your arm and a slight twist of the wrist. More on strumming later. Let's make sure this E major chord is ringing out and sounding great. We have the chord diagram just here, which has a slightly thicker line at the top, and this is our guitar neck, that thicker line is actually the end of the guitar, it is vertical so that it's even for both left and right-handed guitar players. You always know what that chord diagram looks like, we will always, on at least my videos from. The last 10 years or so show vertical chord diagrams. Occasionally people see these as kind of upside down or anything. You're just looking for that slightly thicker line, and then you can see that the index is on the 3rd fret, even though the dot on the diagram will show it in the middle of the fret area, practically, we want to be at this side of the fret and really curled over with your knuckles of your fingers. That first knuckle near the tip of the first finger, for example, needs to be really curled over so that the thinnest two strings do ring out. We also don't want the bottom of your hand or the palm of your hand touching the bottom of the guitar like this. We want it to be away, thumb right in the middle of the back of the neck, behind that first finger. That index finger's the key, and the middle finger and ring finger, follow it, strumming hand elbow into your side, and then those knuckles of the fingers being curled should mean that everything sounds great and rings out and sounds like I am. Double check you're in tune if that is not sounding correct. And the other thing we want to do is pick each string one at a time from 6 to 1, so string 6 is nearest to you. That will ring out probably without issue. String 543 can sometimes not ring out and what will be causing that is a flattened off 3 finger or ring finger, keep those right on the tips. And that will ring out, string one. And 2, Uh, all on that first finger being right on the tip and not too flat, and then making sure we're not touching the bottom of the guitar. And that is our E major chord. Now that is gonna take a little bit of time to bed in, and we've built that into this course, and for that reason, especially on electric guitar, I want to show you straight away another option that we have to play an E major chord, especially when we have. A more overdriven or kind of chunky sound, and that is to play something called a power chord, you might have heard of these before, you might have played one before, but we have the major chord. Which major or minor chords are the bulk of how we do strumming songs on guitar, but many of the songs in this electric guitar course, whether they're rock, blues, or any genre, actually use something called a power chord, which we can play simply with one finger, and if we just relate it back to this E major chord for a second, where the middle finger is, is where we're gonna place that first finger, cause all we're gonna do is play string 6 and string 5 together. From the E major chord, and if I play this with the heaviest sound that I have on my amplifier. Yeah, that sounds really rocking. It doesn't have to be that heavy though, this is not just a rock music thing, though that is what it's synonymous with. We can play it like this, or with palm muting, and this can be how we play a lot of songs, and all we need to do is place the first finger, the index finger, where we had the middle before, this is on string 5, fret 2. Super easy, lots of songs use this, this is the first chord of Back in Black. Of I love rock and roll. And so many fantastic songs, especially by AC DC are in the classic rock genres, but also by the Beatles and The Rolling Stones. The trick is, we only want the thickest two strings to ring out, and we just do it with a slight twist of the wrist. Like this And then we silence, silence is very important with power chords cos they're so loud and overbearing. We want to also Mute or silence them, and that is how we play the E5 power chord, sometimes just called a power chord just for short. And we'll be checking in with this a little later, but we're mostly gonna be checking back in with this E major chord, because if we're going to strum any songs at all, we are going to need major and then minor chords, not just one finger power chords, cos although this sounds awful fun. We're going to limit ourselves to one type of song if we just do power chords, and with major and then later minor chords, we can play anything at all on guitar, any songs. They don't even have to be guitar songs, we can play absolutely anything with this. And a recap of that is index finger on string 3, fret 1. Middle finger, string 5, fret 2. Third finger just below the middle finger on string 4, fret 2. That's our E major chord, and what we want to try and do as soon as possible is memorise this shape. This is what's going to maximise your progress on guitar, especially with open chords. memorise the finger shape and the shapes on the fretboard in general, rather than just thinking about each finger individual. It's this we're wanting to memorise. This is the E major chord shape. And we just place that chord ship on guitar, but when we lift it off, try and keep that shape. So have a go at this. E major, just lift it off by like 1 centimetre. And place it back down, and then lift it off again by 1 centimetre. Keep your fingers really still and then back down. Now you're gonna have tension for now cause we're keeping still. But we want this to be as normal as possible, and the more you lift them off and put them back down in that same place. That is what we're trying to solidify, and that is what's going to maximise your progress with chords and simple strumming songs. And a final demo E major That is what we want in any muted strings are caused by flatter fingers, perhaps the elbow not being to the side, or perhaps the thumb being really over the top like this, thumb low, elbowing to the side, fingers right onto their tips, really curled over like a claw hand. And that should ring out fine, but that is a lot of work, and remember we can at any point take a break from that and just play a one finger E5 power chord. And you are still playing an E-chord, which especially works with overdrive or distortion, but it is also played with the clean sound for blues, for sixties songs, for many other songs that we will look at throughout this course, but don't sacrifice the E major because alongside the next chord we'll look at, we can play a lot of songs and a lot of classic songs with these chords.
In this video
I walk you through how to play your first full sounding chord — the E major chord
How to make it ring out clearly
Easy one-finger version: the E5 power chord, perfect for rock songs and heavier sounds
Key Points from the Lesson:
E Major Chord Setup:
Only needs three fingers
Finger placement:
Index: string 3, fret 1
Middle: string 5, fret 2
Ring: string 4, fret 2
Tips:
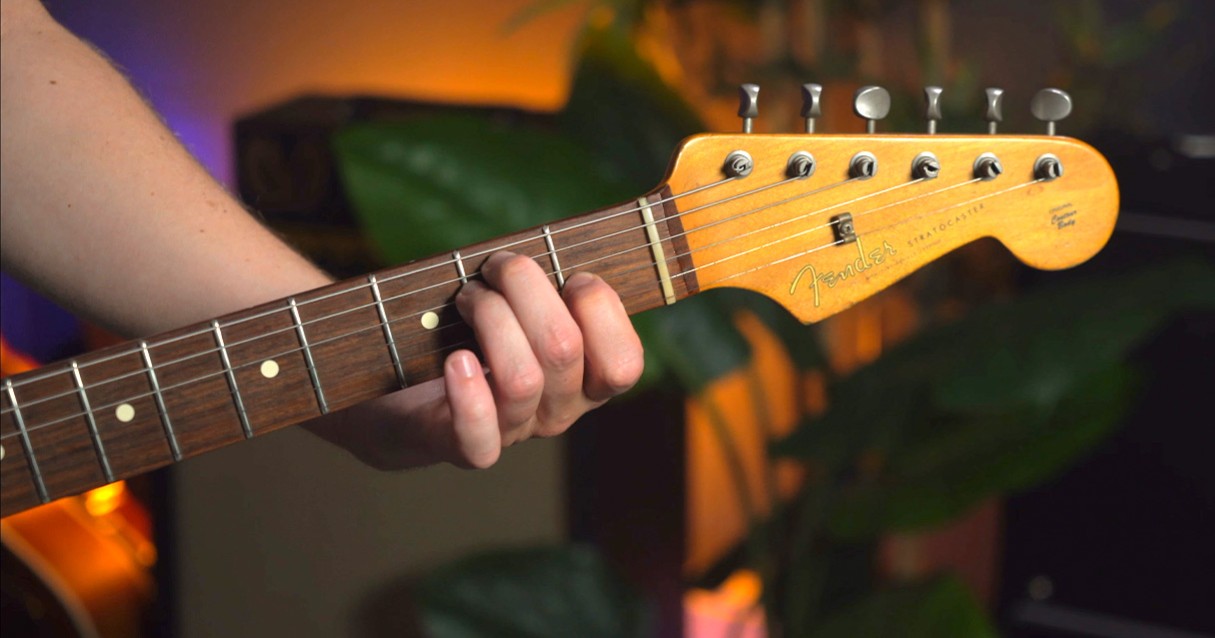
Use fingertips and keep knuckles curled
Avoid touching the guitar neck with the palm (on our fingertips to help all the notes ring out)
Chord Diagram Explanations
Thick top line = nut of the guitar
Diagram shown vertically for both left- and right-handed players
Finger dots show fret positions, but aim for fingers just behind the fret
E Major Chord - Played On Fender Stratocaster
Strumming Tips:
Use a pick for a bright, clear sound
Can also use the nail of the index finger or thumb
Strum all six strings from the top down with controlled motion
Sound Checking:
Pick each string (6 to 1) to check clarity
Muted or buzzing notes usually caused by flat fingers or poor hand posture
Curl fingers and position thumb on back of the neck
E5 Power Chord Introduction:
Simplified version of E major
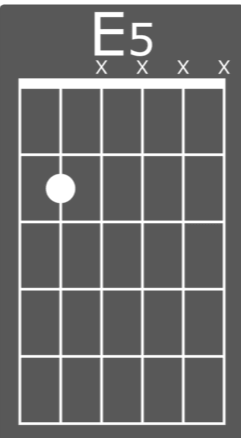
Played using just open string 6 and 5 with one finger (string 5, fret 2)
Great for overdriven rock tones (e.g., AC/DC, Joan Jett)
Important to mute other strings for clarity
Ideal for early electric guitar playing and building confidence!
Technique Refinement:
Practice lifting and placing the E major shape without altering finger position to build muscle memory
Keep elbow in, thumb low, and form a “claw” hand shape
Final Advice:
Focus on memorising chord shapes, not just individual finger positions
Major and minor chords unlock the ability to play virtually any song, unlike just using power chords which don't have these qualities
Beginner Electric Level 1
Recommended Songs
Enjoying this course? Want to test out your new skills? Find out my recommended song tutorials that accompany this course and get total access to the site by signing up today!