
Fingerstyle 01 - Single Finger Exercises
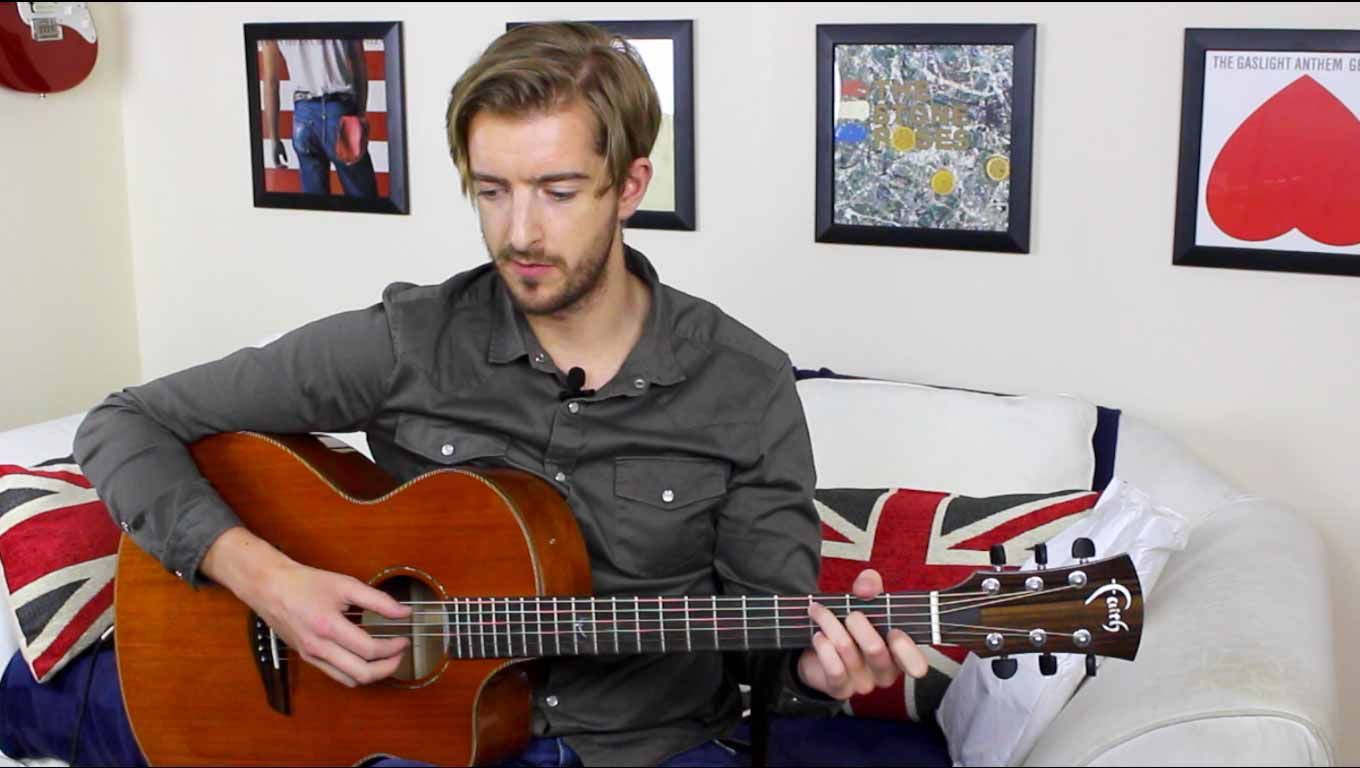
OK, so anyone that has watched my videos before knows that I have a real leave no man behind kind of mentality. So in this video we're just gonna cover the absolute basics on the right hand, on the picking hand, but we're on a C chord for everything that we will do in this video in particular. So in the left hand, in the cord hand. I'm just gonna be holding this sea cord down the entire time, let's have a close-up on the right hand. So a quick reminder of a couple of those principles that we looked at in the first video, because there were a lot of them, I appreciate that. The thumb is most of the time going to play the thicker 3 strings, any one of the thicker 3 strings. And the first three fingers, 123, get assigned and pluck underneath strings, 12 and 3, and we can sort of set up in this fashion. As I say, I'm just holding down a sequel. And we're just gonna get each single finger working to make sure that everyone that goes for this course has a place to start, if they've, even if you've never attempted finger style ever in your life, and to make sure we're all on the straight and narrow. So first of all, we're just going to play the root note of a C major chord, which is just plucking the string 5, the 5th string. But we're going to pluck this uh on the beat. So that would be 4 times per bar and we're going to play that for 2 bars. In the book, in the tab that is on this DVD or download and in paper format, this is single finger exercise 1 in this book here, OK? So remembering to keep our thumb in front of our fingers, kind of like a uh giving a thumbs up a little bit, kind of like this, as opposed to doing this, otherwise we'll get a scratchy sound even with the thumb. We want to just pluck the thumb. Like this, A little bit faster than a ticking clock. What we're wanting to avoid is the thumb resting on the string at any point. OK, so if this is happening. That's something that we need to avoid. We need. A constant note always ringing out. 1234, and it's really done by the thumb moving into the hand, although there are different techniques that we can employ. In fact, sometimes we can get a little bit of arm movement in, and that's totally fine. The other note that the thumb might play on a C chord. Is the string directly underneath that, string 4. So this is the root note, this is a C. And this is an E note, the next string down, if I keep my C chord down at the other hand, and we're gonna go for that one as well. At the same kind of tempo, 1234, and again, 234. And that is bars 1 to 4 in the tab that is in the book or e-book. Then we're gonna move to the first finger, which plays string 3, and again, just retracts into the hand. While we're doing that, we've got uh the guitar held at the inside of the elbow here, OK, so it's so it's secured. I, I'm not holding my guitar now other than with the inside of my elbow. It's wedged right in at the hip here. My leg is slightly raised, and I have a chair that's the right height with good lower back support. That's the way to be doing this right from the beginning. And that first finger when it plays string 3, again, it's just going to pluck into the palm of the hand, and everything else will remain in this kind of position. Uh, I'm not resting the wrist or resting the little finger. You can do those things, however, in this course, that's not what I'm going to be doing. If you, if you're wedged in with the guitar held in those three points, lower back, here with the foot raised, and inside of the inner elbow, you shouldn't need to rest your pinky or your palm or or anything. So 5 is 1. 34, and again. 234. So we're not using the nail, really at all. The only time we're gonna be using a nail is in a second when we strum with it, and we're gonna use the outside of the first finger, the nail of the first finger. To do that, Um, the next note is with the middle finger. Playing string 2. 1234, and it's really important that the reason we're doing this is to get used to how each string. And each finger feels when you play it, remember this middle finger always just plays this string with the methods that we're looking, and the third finger would finish off playing the thinnest string. While still holding down that sea cord. And that's how that first single uh single finger exercise, so exercise 1 on page 8. That's the, the complete first exercise, nice and easy, but when we play it all the way through, pay close attention to how this sounds and try and emulate it. We're going at a steady pace at around 80 BPM. Play along with me if you wish, or have a watch and then rewind and play along. In 1234. Thumb, 234, and again. 234, string down 12. And again, First finger. One. And again, 23 middle finger 1. 34, and again. 234 and 3rd finger. 2. 34, and pause. That'll be the end of that. Now, it may feel quite harsh on your fingers if you're not used to doing this, especially when you've done it even just for a few minutes. That's totally cool and um it may take a few days or a couple of weeks to build up the calluses on your, on your uh the skin. Skin of the tips of your fingers, just like it did with your fretting hand, but um, persevere with it, cos I really don't think playing with the nails or or doing, having a thumb pick or anything is the way to go, not at this level at least. If you wanna do that later on, that's cool. But what we're gonna do now is just that same exercise, but have a strum. Of just of the C chord, always of the C chord on the first bar of everything we've just done. And uh when we strum with finger style, we typically use the outside, the nail of the first finger. And then we're going to pluck. pluck, pluck, and then we're gonna strum again. And use the er and use the thumb, sorry. So And then we would continue on. first. first Uh, M. So on and so forth. And again, get used to how it feels with possibly the new way that you're holding the guitar, if you're getting used to not using your little finger or not resting somewhere else. Give it a chance, it really brought on my playing and all this kind of coordination that we're developing here, even just playing single strings is gonna go on. That's a pattern that's the inside out pattern. It's, it's gonna go on to be used at every point in, in this course, OK. So from the top, we would strum and then begin with the thumb. Make sure the thumb's pulling in to the fingers like this, uh, to the palm of the hand, and we're still getting each note. Really ringing out And not sounding like this. Ready from the top in 23, strum. Down a string 4 again first middle, middle. middle, Little. Third, and that's the end of this exercise, you could do that same thing with any chord, but the idea is that the first note would, would be appropriate to where the root note is of that chord. And because of the added knowledge of the key of C and, and root notes and, and things like that, that's what this first disc of the of the DVD or these 1st 5 or 6 lessons are really about, just getting this technique and getting a bit of knowledge and then the patterns and more on the second DVD and then you've got the songs on the 3rd DVD. That's the end of this lesson, let's get on to the next one.
In this video
Free Fingerstyle eBook Guide
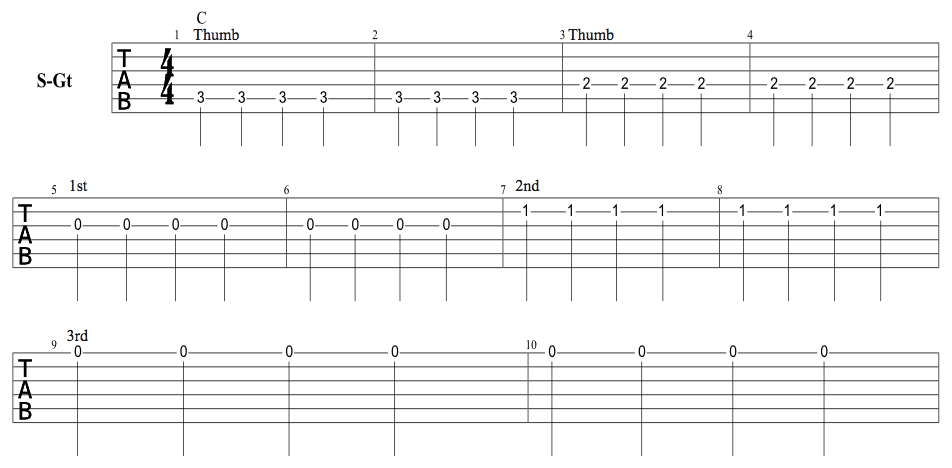
These two exercises are for those who are completely new to fingerstyle. It can also be used for those who want to double check their technique with the principals covered in the introduction on the previous pages.
To get started, we’re going to play each string one at a time using the correct digit on the finger picking hand. We’re going to stick to a C chord only for now, but you could do this for any chord or chord sequence you like. Try this same exercise with any other chord you like if you need more time to get used to this new fingerstyle techniques.
I have written which digit to pluck the string with above each barre, use this same digit for every two bars until the next digit is written. This should be played at a stead pace of around 80 bpm, which is a little faster than a ticking clock.
Single Finger Exercise 1
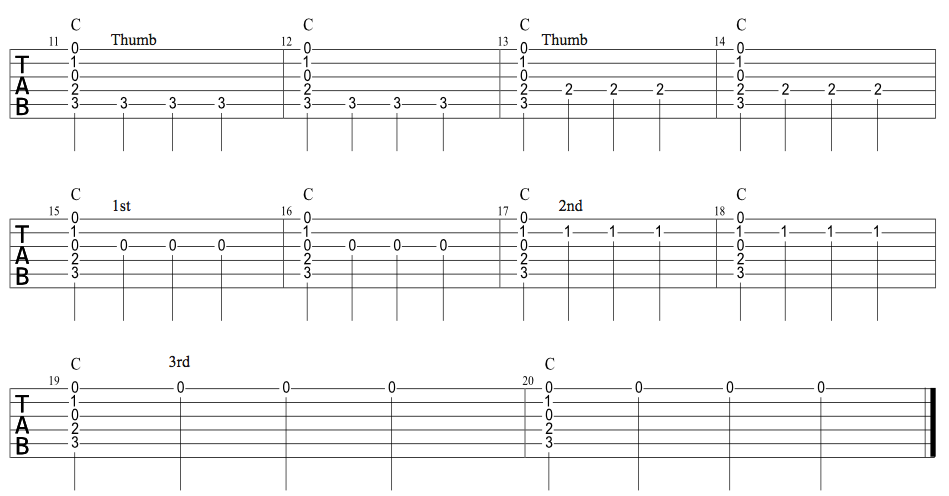
Single Finger Exercise 2 - add a strum
Here we are simply going to add a strum of the normal C major to the above exercise. Strums in fingerstyle are commonly done with the nail of the first finger, which should emulate the sound of a pick.
Fingerstyle
Recommended Songs
Enjoying this course? Want to test out your new skills? Find out my recommended song tutorials that accompany this course and get total access to the site by signing up today!