How To Read Guitar TAB and Neck Diagrams
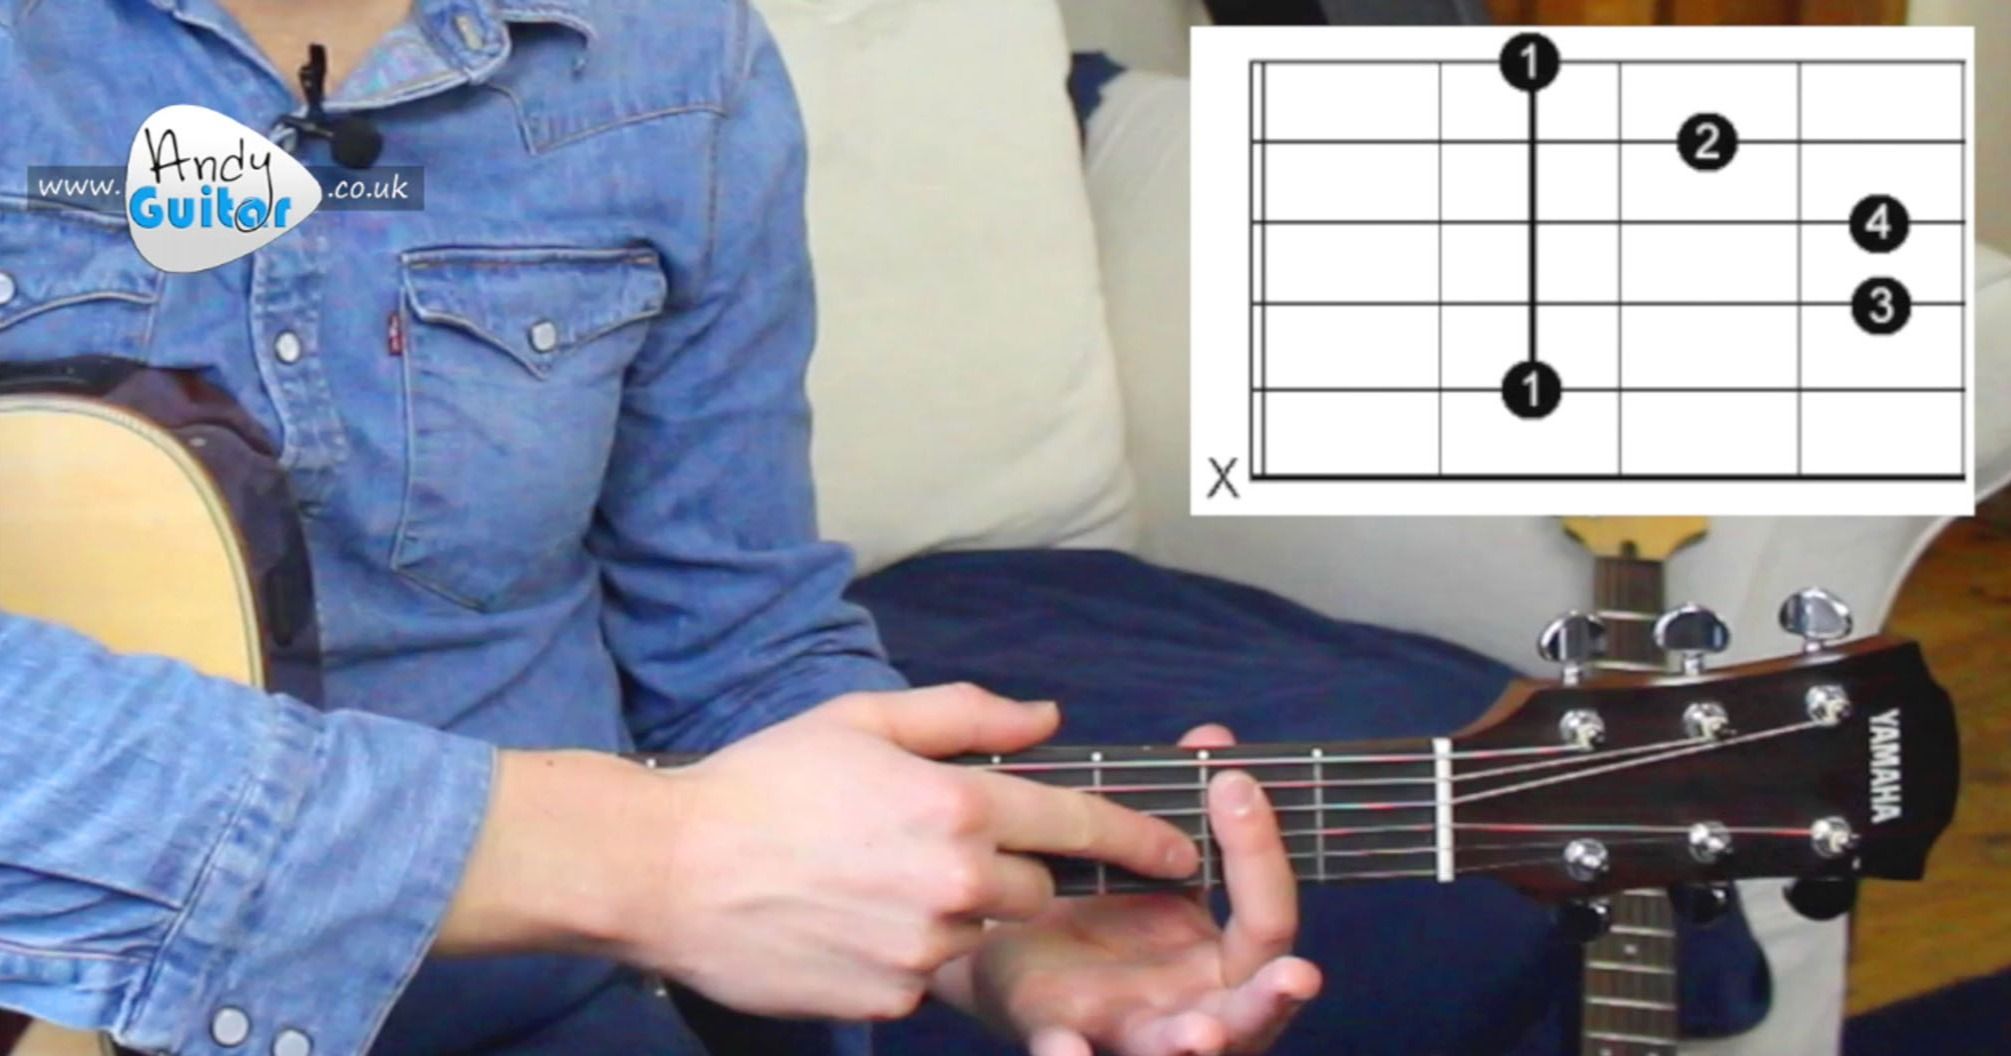
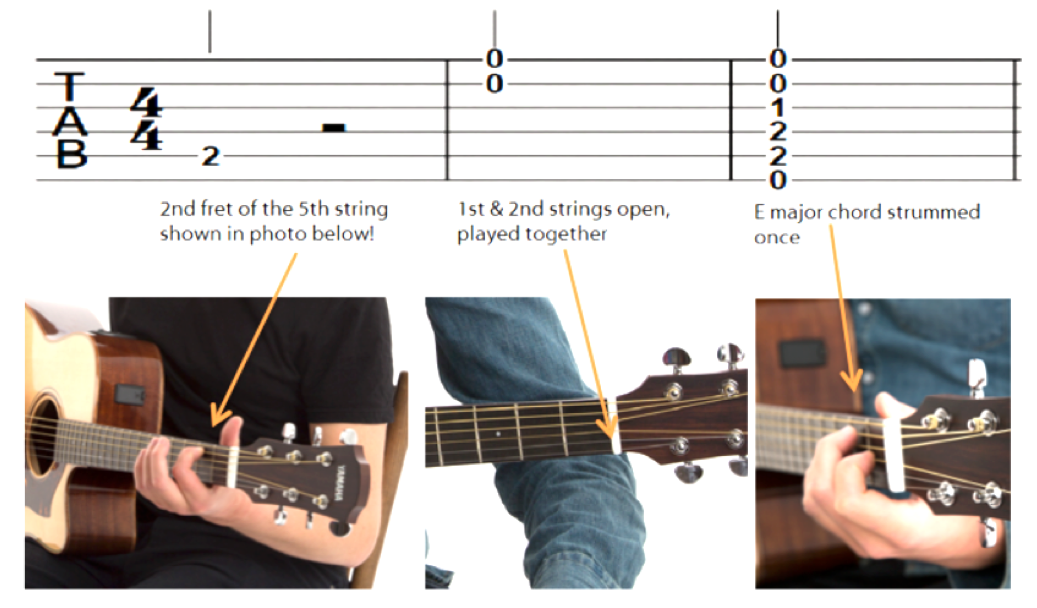
Hi guys, my name's Andy, and in this video I'm showing you how to read chord boxes, also known as neck diagrams, and also a beginner's guide on how to read something called Guitar Tab. Now both of these are the ways that chords or songs can be written in guitar-based music. So this diagram visually represents this E major chord. So we have the double lines which represent the nut of your guitar here and the lines going across which represent the strings. The dots represent which finger should go where. And in this case we have our first finger on the 3rd string at the 1st fret shown by that little number 1 there. The middle finger or the 2nd finger goes on the 5th fret of the 2nd string. And your 3rd finger would go on the 4th string at the 2nd fret here. So that would be 1. 23. Now these can look a little upside down to some people, but from your angle because you're placed above the guitar, uh it is the correct way round for you and the way that they are commonly written. Guitar neck diagrams are sometimes written, displayed upwards like this, which is more even in some respects for the left and right-handed guitarists. But in my opinion it's best to make sure you know how to use this most common way that they are they are written. And after the left-handed guitarists amongst you get used to it, you won't see a difference and you'll be fine with it. When you do see a line on a chord. Box or neck diagram. Uh this is typically where we will be using a barcode, which is where we place a flat first finger at whatever fret it says. In this example it's the second, and this will be holding down all the strings that the diagram would say. So in this case, this is for a B minor barcode, far in advance of beginners, but it simply shows you what that vertical. Line means which is this idea of barring. Now as I've said previously, guitarists have no reason to be able to read traditional notation, but we have guitar tablature for a visual representation of single note lines or more detail about exactly which strings to strum if we're playing a chord. Now again we have horizontal lines in this guitar tab and it even says that it's tab. Short for tablature, and every horizontal line is a string on your guitar. The thinnest string is represented at the top and the thickest string is represented at the bottom. Again, this may seem a little upside down to some of you, but the thinnest string is the highest and therefore it's on the top. And it's correct with having the guitar in front of you because it's the same way if you have it on the page and with your guitar on your knee. This 1st example says that we need to play the 2nd fret of the 5th string like this. Now it doesn't say which finger I'm supposed to use for this, we'll need some prior knowledge and technique of playing single strings before we can intuitively know that. But we'd always presume, unless there's another reason not to, just to use your first finger, especially if there's a higher note on that same string. If there's a lower note appears on that same string, for example, if it went from 4 to 2. We would use your 3rd finger to play 4 because that's most comfortable. This representation shows us to play the thinnest 2 strings at open so we don't need any fingers down and we would just strum or pluck both of them together. And this final representation can look the most complex, but it actually just shows us to play a chord because we're playing all the notes at the same time. And this is an E major chord displayed in tab. And let's see how that's the case. We have the thickest string which is the lowest one which says 0. The next one, the 5th, says 2nd fret, and that's correct here. The next one is 2nd also. The 3rd string says 1st fret, the little number 1, and that's correct. And then finally open and open. And whenever you see a line of tab like this, it's quite common for people to get a little overwhelmed but it's always just means a chord, so it's probably, it could even be a chord shape that you're already very familiar with like this E. So it's certainly nothing that should make you uh turn away from learning that, especially if there are any zeros in the tab because that would mean it's an open code that it uses open strings and it's the open codes that we'll be learning in this beginner's course. So this has been the final video of 6 videos showing you all the basics of the physical elements. Elements of guitar like what the different parts are called, how to tune your guitar, the names of the open strings, etc. etc. So do feel free to go back and check any of the bits that you may have missed, but from here on, we're gonna be covering level one of my beginner's course, learning the E and the A chord and learning how to play real songs with just. Those two chords. So I do hope you'll join me in that beginner's course, it is available for free on the website. It does come with an accompanying ebook and download options. As I say, more information will be available on the website, under my beginner's course. I hope to see you in one of those future lessons. Take care of yourselves and bye for now.
In this video
Andy Guitar Beginners Course eBook 2016 - 2nd Edition
Guitarists don’t need to read traditional notation, instead we have Tablature, aka TAB. TAB is a graphic representation of what frets we are playing on what string on the guitar.
Each horizontal line represents a string; each number represents a fret on that string.
There are other special notation symbols e.g. for string bends and slides. These skills are not in this course so are not featured here. They can be found on the website.
