
Open Chords E, A and D
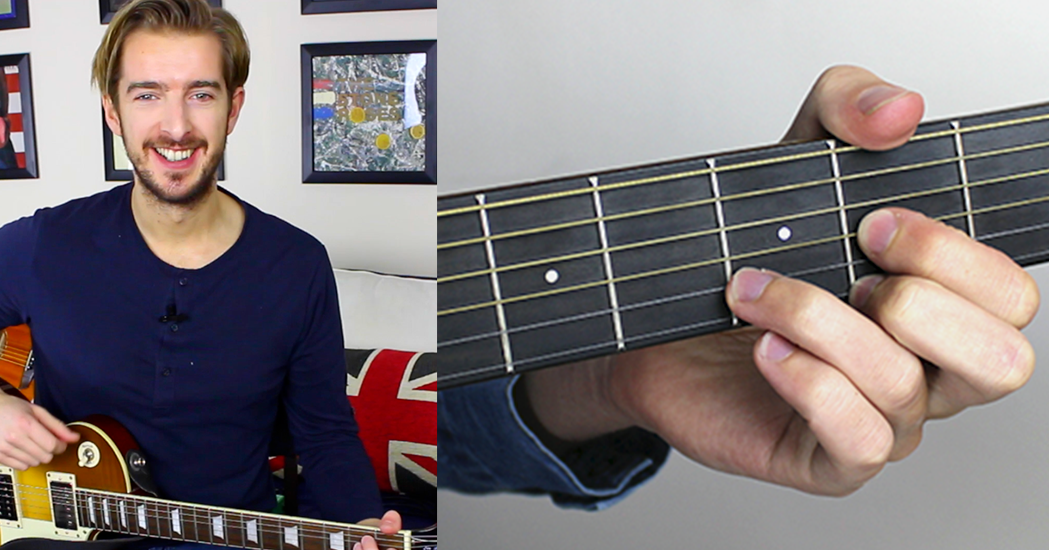
Hi guys, how are you doing? Thank you for checking out lesson two of this 10 lesson electric guitar starter course. Now if you're having any problems getting the sound right of your electric guitar or want tips on how to use the amplifier or anything, um, or even amp settings, do check out the first lesson in this full playlist and if you. If you have any problems with the open chords that are in this lesson, do check out my full beginner's course that's also available at Andyguitar.co.uk. Let's have a close up on this awesome riff that we're learning in lesson two. OK guys, so the chords we're using to play this little riff are an E major chord. An A major chord, which I'm playing in this fashion in sync with my beginner's course. This chord is taught at level one of my beginner's course. And it allows the first finger to stay down between the E, the A, and the final chord which is the D. Which is taught at level 2 of my beginner's course. So if you need help with any of these individual chords. They'll all be covered at level 2, but the change between the E to the A, that's all covered at level 1. And uh the riff we're going for sounds like this. OK, so we're playing this to a very similar rhythm as we did in lesson one of this little electric guitar short course. Um, but we have a slight difference in that we're playing all six strings for the E and we're playing each of the major chord versions, not the power chord. And we start with just a single strum. So it's strum the E, mute, and then 2 strums of the A. You can, if you prefer, play an A3 in a line like this. Some people even play an A major like this, however, I just can't advise that because it's got to make it harder if you look at how much my fingers have to move to get to and from the D major. However, there will be some people that prefer that and any way you're playing E, A, and D is totally fine. The main idea of these lessons is to get playing along to the backing tracks and learn the fundamentals of rock guitar. So we strummed the Echode once. And then mute. I've taken the overdrive down quite a bit on my amplifier, so this has a bit of a sixties vibe. We then move the first finger over, change to the A major, strum twice. And then of course mute straight away afterwards. So to begin the riff again. Mute. Mute. And then we go for a D major, played just the once. Mute once. And then finally, it's another pair of ears. So if I play this again really slowly so you can see the changes and you can see the muting, we're going to play this. Notice how the muting makes the changes easier cos it gives you more time to change, but the muting is also synonymous with rock guitar. Every rock riff from, you know, Back in Black by AC DC to er to any number of rock and roll riffs. Has this mute in it, so that's what we're learning. So we strum E once. We play a twice. We play D major once, making sure that we don't strum the thicker two strings on the D, really important. I only want to strum it once, if we strum all 6 sounds really bad. Ooh, ugly. But the thinner strings sounds great. Just the once And then A Finally, twice. Let's play that together and then we'll have a go to the little backing track which just we loop this riff for its entirety, but it's a practise in you playing along to a track which is great practise if you want to play along with a band or just improve your time in in general. So here we are with the Echord in 234. Mute A twice. once. Eh, twice And repeat, 34. Repeat. One last time. Slow And we're going to finish the track as we will generally do, the first chord that starts the song. Give it one long strum and the thing sounds like it's finished. Let's have a listen to the backing track as always we have a little counting. 12. 1234. And if you just listen to the track of its own. You can hear the bass, which is playing the root note of each of the chords. And you have to make sure you strum in time with that bass and use the drums to keep you in time. And. Just as an example, It's no good to just play the riff. In your own time, you have to play it along with bong bong bong. Bang. And if we just listen one more time, if we strum, mute. Oh, that's the end of the track. It is a short one, that was exactly 1 minute long. Um we're muting on where the the uh snare drum happens which is the kind of dah. Da, that sort of hit sound um sounds a bit like a clap I guess. And that is again synonymous with rock guitar, strum, mute, and that mute is on the dah, and it gives you this big snare drum sound which is um what classic rock and many rock genres are all about. Little bit faster than we did in the warm up, but let's give it a go, guys. I've got a lot of confidence with this one, especially if you've done the beginner's course at level 2. Let's give it a go together in. 2 1234. Yeah. Repeat. OK, pause there. That is halfway. Now, so that's halfway through the backing track, we will play through the whole thing, but in case that was something that wasn't happening for you, let me give you a couple of pointers. So keep your strumming hands small and keep your finger motion. as small as possible. If you're lifting everything off like this in between every chord change, you're not gonna get there as quick as if we're keeping that first finger down and keeping all your fingers as close to the strings as possible. Same with a strumming hand, if you're doing this, You know, kind of lifting it up here and really sort of attacking it rather than just strumming. In a more economical motion. It's it's gonna take longer to do and you're gonna be more forced with momentum rather than thinking am I in time with the track. So one more player through together, keep the motion small and let the guitar and the amplifier do the work. You can press down really lightly with an electric guitar er if you have your amplifier set correctly, OK? The fuzz on the amplifier. Will do a lot of the work for you, especially compared to an acoustic. You can strum and play a lot lighter than you do on an acoustic to get a lot more sound cos the sound's been amplified. One more player through just me and you and then we'll go along to the track. Ready? In 2. 34. Change. Change Change Even slower One last time. And one last tip just to finish up before we play onto the haul track, the D-chord especially, I'm on a real angle like this and if you notice there's no real gaps between my finger. If I'm uh more like this and more straight, it's a much more uncomfortable way to play this particular D major chord. And if we have the thumb just creeping over the top and the fingers like this, it is a lot more comfortable and allows for easier changes. It's just way less. of a stretch in our hand. Whenever you're stretching our fingers er if we're on the thinner strings, we can get an easier stretch if we've got that thumb over the top. That is very much a beginner's tip just to qualify it. Advanced players, no no no but for beginners this is a real handy tip to have your fingers on this angle when you're playing the thinner strings. And to have all the fingers as far over this good side of the fret as opposed to over here. And it may not ring out as well. Those tips and more in the beginner's course, which is free on the website. Let's play along to this entire track. It's only 1 minute long, 60 seconds guys, let's do this together in. 2123. And keep it going. Halfway now 3 more times. Final time Finish on an Let And there we go, that's how to play our 2nd track with E and A and D, Open chords. Give yourselves a pat on the back, that was really cool guys.
In this video
EGSC Track 02 TABs E A D
EGSC Audio Track 02 E A D
Welcome to Lesson 2 of this Electric Guitar starter course focusing on Rock guitar!
In this lesson, I show you how to play a short guitar riff with just three easy open chords; E major, A major and D major.
If you need more help with these chords, check out this lesson from the free version of my beginners course.
NEW Interactive TAB!
Click the play button below to jam along with the audio jam track for this tutorial while also seeing the TAB in real time!
Interactive Tab
Become a member to access this interactive tab section.
Chords & tips!
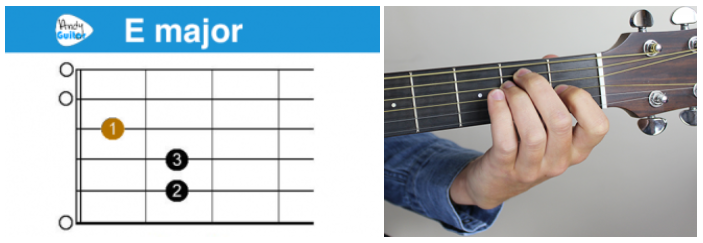
This is the E major chord. Each number tell you which finger to place down; 1 being index, 2 is middle and 3 is ring finger. Anchor finger in yellow.
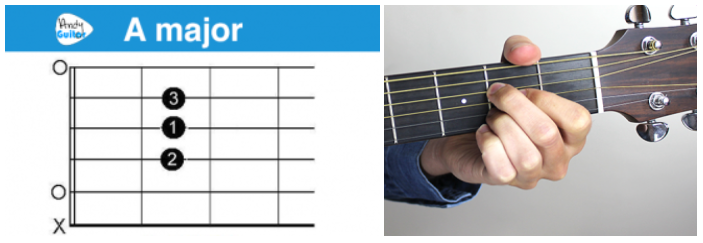
This is the 2nd chord we'll learn, the A major chord. Notice the 1st finger is on the same string as it is in the E major chord.
To change from the E chord to the A chord, keep your 1st finger down, lift off the others and slide it to the 2nd fret
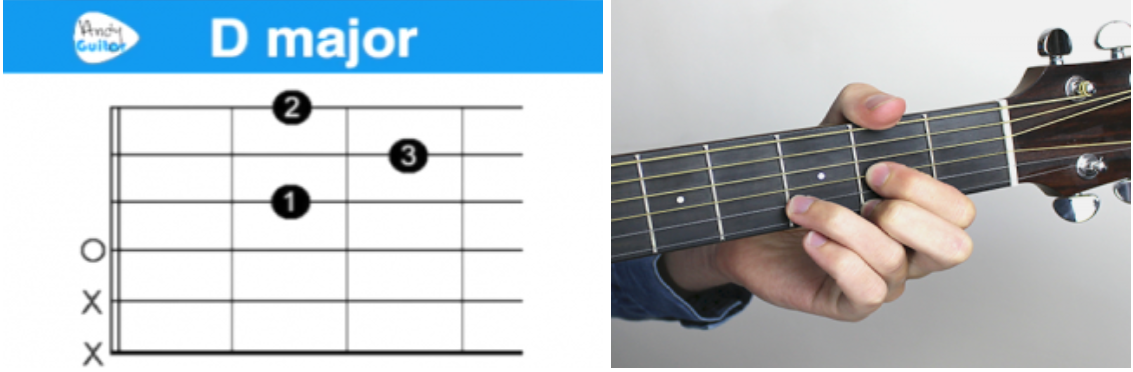
If the D chord isn’t ringing out when you change
Don’t keep your 1st finger totally still. Instead, slide it from the middle of the fret on the A to the ‘good’ side of the fret on the D! This is the most common cause of the D chord not sounding good during a song- make sure you slide the 1st finger over!
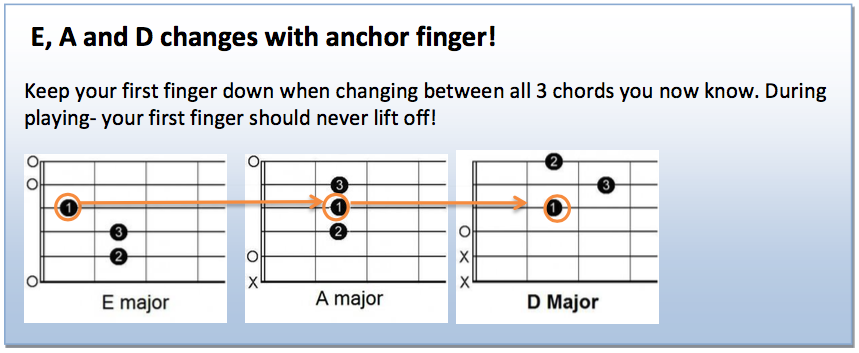
The anchor finger is crucial here. Any chord change you struggle with should be practiced for a minute each practice session
Electric Guitar Starter
Recommended Songs
Enjoying this course? Want to test out your new skills? Find out my recommended song tutorials that accompany this course and get total access to the site by signing up today!