
AC/DC Style Chords for Beginners
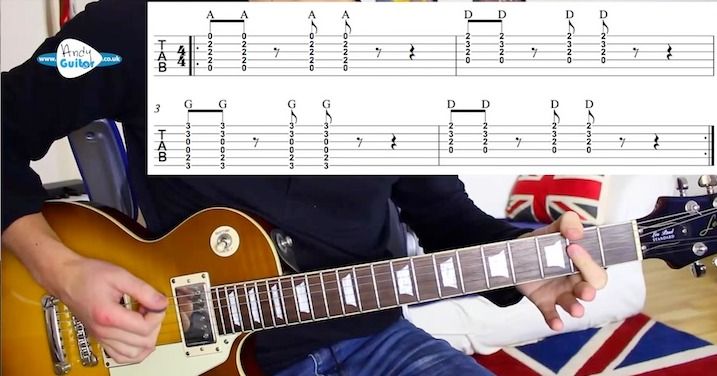
That is the little riff that we're going for in this lesson 5 of my little rock starter course. Um, it has the three chords, A major, but we're, I'm gonna encourage you to play A major with your first finger like this, which is kind of in the rock style. But if you really persist. This A major sounds absolutely fine. And many advantages which we'll go into. A D major. this. G major with the 3rd and little finger down like this. And I'll talk you through each of those chords in more depth now. So we're gonna play A major like this. This is the one finger air cord. From level 3 of my beginner's course. played like that. The technique that we want to move towards is kinking the first finger like this so we can get the thinnest string ringing out as well. We certainly don't want this first finger to be holding down the thinnest four strings, otherwise we kind of get a Beatles sounding A 6 chord, which isn't what we have. We want this kind of idea with the first finger. And if you can't get this uh thinnest string to ring out like this. Then just play the string 54, and 3. And that will be totally fine. We want it in the following rhythm. mute. So palm muting to get silence. The same way we have done before. Pressing lightly, but we don't want any sound. You know, we don't want any notes ringing out. We want silence like this. Then we move to the D major chord, which is played 1. 23, ideally with the thumb just creeping over the top and all your fingers on an angle pointing towards your strumming hand shoulder or towards um where your eyes are looking at them. Rather than like this. We'd then strum the same rhythm. mutes and strong. So we have so far. And this longer mute at the end gives us more time to change than you may have had in the songs that you've learned so far with these chords. The next chord we're going for is a G major with the 3rd and Little finger down. You can as another extra little trick, uh, play the Rock G, which is without our first finger being down, but we need to mute string 5. Um, so that the, uh, underside of the middle finger is touching string 5. And that won't be heard. played this, it's a very subtle difference. But does tend to clean up the sound a little, make it sound less muddy when we have this amount of overdrive on our amplifier. So that is the Rock G which is very handy for this kind of song. And then we'd go back to the D. And uh that is our entire riff. Let me just demonstrate it once and then we'll have a slow play through together in 234. That's what we're going for, play along with me, we'll go just a little bit slower in 234. One more time in 234. D Rock G. Finish on the D. And that is the riff that we're going for. Couple of pointers. We have plenty of time to move between these chords, but they wanna be ringing out when you're doing it, so make sure every note is fretted at this side of the fret. Rather than at this side of the fret. Otherwise, The notes won't quite ring out as well as they could. We don't want any sound other than the silence. And particularly on the D, make sure you miss out the thickest two strings. So it sounds like this. Rather than like this, if we hear a D on its own. That's from string 4, from there. And if we have all 6. Sounds very bad. The air is from string 5. D is the thinnest 4 strings. And then the G, rock G is all 6. Let me demo this along to the backing track so we can hear what it sounds like. the All of these codes and changes are based upon the stuff that we're learning at level 3 of my beginner's course where we kind of master this D to G change by keeping this third finger down. All of this techniques. Is covered really thoroughly in level 3 of my beginner's course. The link to that is in the description below. So if you need more help, uh, go for that one. Loads of song suggestions and song lessons at that level as well. Um, really highly recommended. Let's have a go at this riff slowly, just me and you, and then we'll go along to the track. So just together now, dead slow from the Achord in 234. D G D And again Awesome stuff, let's have a go from the very top along to the backing track, it's a little bit faster this one cos we're getting a little bit further through through this course now. Uh let's have a go in. 21. Yeah. G Just going to strum. So if you pause that. OK. So hopefully you could play along to the riff there. Let me just make sure that we're aware of what's happening with this one. let's go for the normal A major, so either like this or like this. Um, I'm gonna go for this one so we can change to that D easier. The A chord. There's the D. And then the 3rd finger stays down. to the And uh let's go for this one. So this will be. I can clean this up a little bit so you can hear it. I'll just turn the volume down on the guitar, which you can do to kind of hear what's going on a little bit more. Each chord 4 times. To facilitate that change and and make it a little bit easier. But let's have a play together, it's a very similar thing and uh just something to nudge you a little bit along in your code changes from the A code. In 123 together. OK dokey, let's have a full playthrough of this backing track now, and this backing track is available on the website, links in the description, along with this entire course and uh you can play along to them without having to get to the end of every video, every time, you can just uh play along to your heart's content. Track 5, here we go, from the riff. 21234. the would be of each chord. Rock and roll guys, fantastic stuff, um, a great song choice to go after this is uh Highway to Hell, which is another tutorial on my channel. Um, we have that one up already, really really similar to this, but this one is just a bit more er bit easier, bit more incremental and um just slightly less happening so that you guys can play along to the track, which is the main thing we're bringing in this one. I hope to see you in the next tutorial in this course.
In this video
EGSC Track 05 TABs AC DC Style
EGSC Audio Track 05 AC DC Style
AC/DC are one of my all time favourite bands!
In this tutorial, we look at how to get this sound, and practice this style of playing along to an AC/DC style backing track!
Interactive Tab
Become a member to access this interactive tab section.
AC/DC style Jam Track - static TAB
Here's the same TAB shown without the interactive feature for those who prefer this style.

N.B. The double line and two dots ||: and :|| are repeat marks. They indicate to repeat what is written between those two points until the next section (chorus), written below.

Electric Guitar Starter
Recommended Songs
Enjoying this course? Want to test out your new skills? Find out my recommended song tutorials that accompany this course and get total access to the site by signing up today!